A garbage disposal is one of the hardest-working fixtures in any kitchen. It handles food scraps every day and if you’re not cleaning it regularly, it builds up grease, food residue, and bacteria that cause bad smells and eventually affect performance. Most people clean the sink around it but forget the disposal itself.
How to clean a garbage disposal properly takes about 10 minutes and keeps the unit running fresh and odor-free. This guide walks through every method from a quick weekly clean to a full deep clean so your disposal stays in good shape year-round.
What Causes a Garbage Disposal to Get Dirty?
Understanding what causes the buildup helps you prevent it more effectively.
Food residue accumulation. Every time food goes through the disposal, small particles stick to the grinding chamber, the splash guard, and the underside of the rubber flap at the drain opening. Over time, these particles decompose.
Grease and fat. Cooking grease coats the interior walls of the disposal. It doesn’t wash away with cold water it sticks, traps other food particles, and goes rancid over time.
Hard water mineral deposits. In areas with hard water, calcium and magnesium leave deposits inside the unit. These create a rough surface that traps more food debris than a clean smooth surface would.
Bacterial growth. Dark, warm, and moist the inside of a disposal is a perfect environment for bacteria. Without regular cleaning, bacterial colonies grow on every surface inside the unit.
Stagnant water. Water that pools in the grinding chamber between uses allows odor-causing bacteria to multiply overnight.
Most of the smell that comes from a disposal isn’t from the grinder, it’s from the rubber splash guard and the underside of the drain flap, which rarely get cleaned directly.
Signs Your Garbage Disposal Needs Cleaning
A disposal that needs cleaning usually makes itself obvious:
Bad smell from the drain. A sour, rotten, or sewage-like smell coming from the kitchen sink is the clearest sign. If the smell is worse when the disposal runs, the unit is the source.
Smell that lingers after running water. If running the disposal and cold water doesn’t clear the odor, residue is stuck on surfaces the water doesn’t reach well, especially the splash guard.
Visible buildup on the rubber flap. Lift the black rubber splash guard and look underneath. Dark slime, food debris, or mold visible on the underside means it’s past time for a clean.
Slower drainage. Buildup inside the grinding chamber narrows the drain opening slightly. If the sink drains slower than usual with no obvious clog, cleaning the disposal may restore normal flow.
Film on the grinding blades. Grease and food film on the impellers reduces grinding efficiency over time. The motor works harder for the same output.
Safety Precautions Before Cleaning a Garbage Disposal
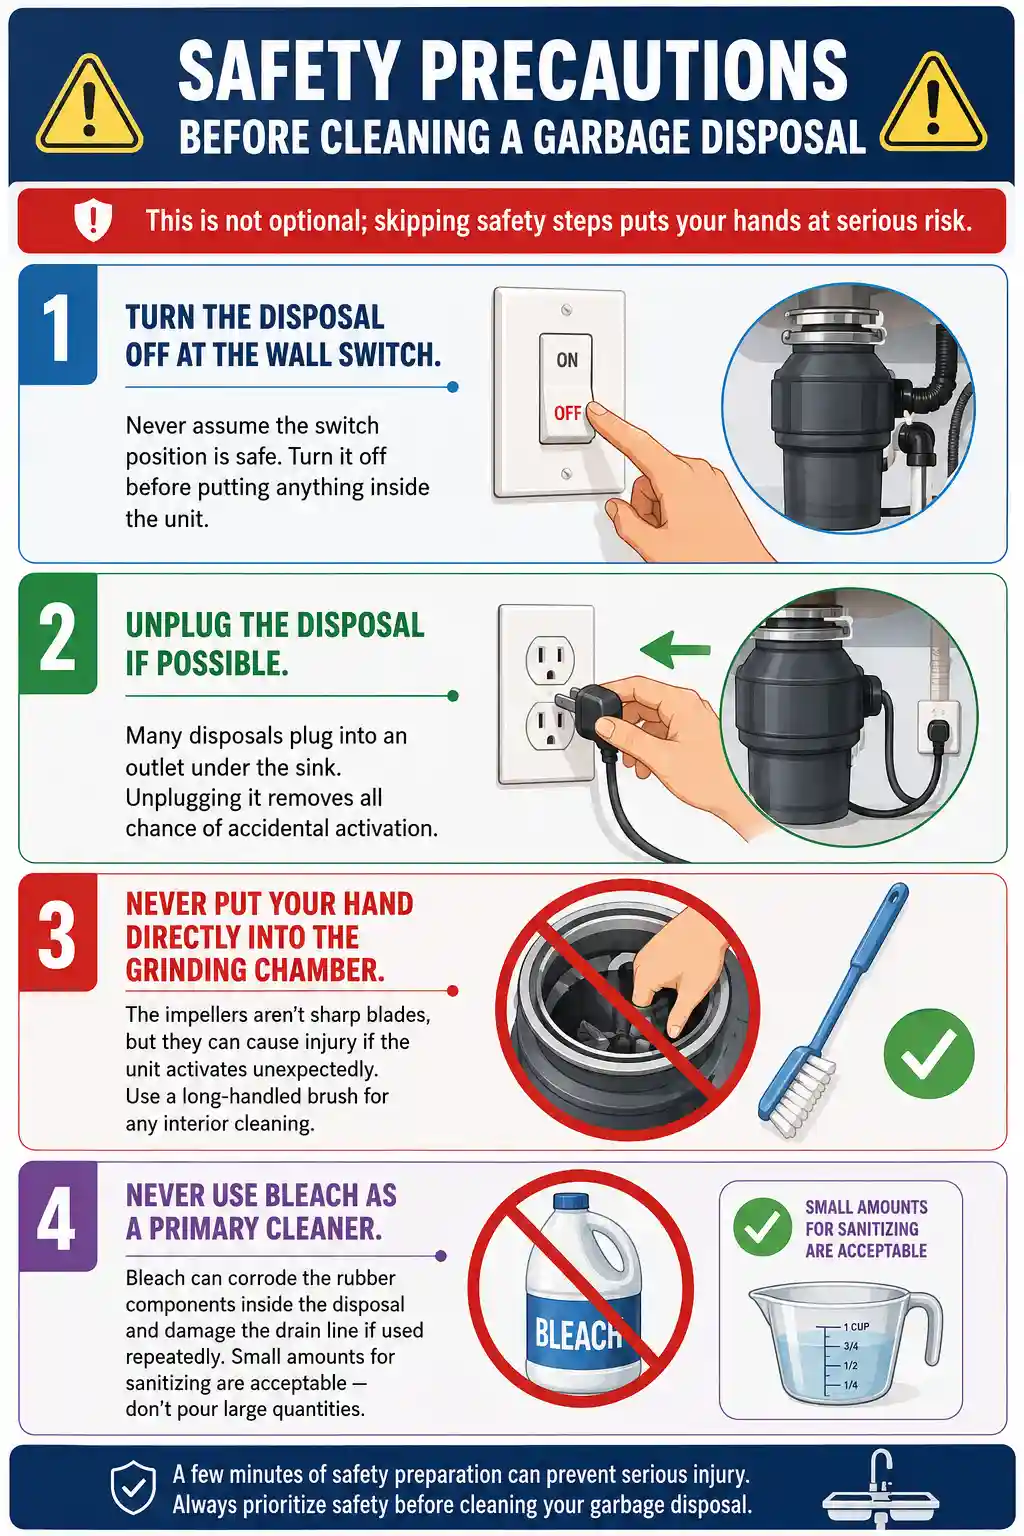
This is not optional; skipping safety steps puts your hands at serious risk.
Turn the disposal off at the wall switch. Never assume the switch position is safe. Turn it off before putting anything inside the unit.
Unplug the disposal if possible. Many disposals plug into an outlet under the sink. Unplugging it removes all chance of accidental activation.
Never put your hand directly into the grinding chamber. The impellers aren’t sharp blades, but they can cause injury if the unit activates unexpectedly. Use a long-handled brush for any interior cleaning.
Never use bleach as a primary cleaner. Bleach can corrode the rubber components inside the disposal and damage the drain line if used repeatedly. Small amounts for sanitizing are acceptable — don’t pour large quantities.
Tools and Supplies You’ll Need
Most of what you need is already in the kitchen or bathroom:
- Long-handled dish brush or disposal cleaning brush
- Old toothbrush
- Dish soap
- Baking soda
- White vinegar
- Kosher salt or coarse salt
- Ice cubes
- Lemon, lime, or orange peels (optional)
- Rubber gloves
- Flashlight (for inspecting inside)
No specialty products needed for routine cleaning. Commercial disposal cleaners and deodorizing tablets are optional and work well, but the household items above are just as effective.
How to Clean a Garbage Disposal (Step-by-Step)
This routine clean takes about 10 minutes and should be done at least once a week.
Step 1: Turn Off the Power
Switch the disposal off at the wall. If the outlet is accessible under the sink, unplug the unit. Put on rubber gloves.
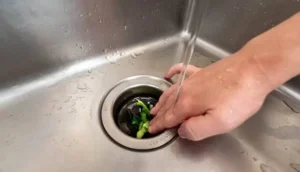
Step 2: Clean the Splash Guard (Rubber Flap)
The black rubber splash guard the flap you push food through is where most of the odor-causing buildup lives. It almost never gets cleaned directly.
Lift the flap and look underneath. Use an old toothbrush or the long-handled brush dipped in dish soap to scrub the underside thoroughly. Work around the entire edge where the rubber meets the drain rim.
This one step eliminates the majority of garbage disposal odor in most kitchens.
Step 3: Flush with Hot Water and Dish Soap
Restore power or plug the unit back in. Turn on the hot water tap and let it run. Add a squirt of dish soap directly into the drain opening while the disposal is off. Then turn the disposal on for 30 to 60 seconds.
The soapy water runs through the grinding chamber and flushes loose debris into the drain line.
Step 4: Baking Soda and Vinegar Flush
Turn the disposal off. Pour half a cup of baking soda directly into the drain opening. Follow immediately with half a cup of white vinegar.
You’ll see and hear a fizzing reaction. This is normal; it’s a mild chemical reaction that loosens food residue and deodorizes the interior surfaces.
Let it sit for 10 to 15 minutes. Then turn the disposal on and run cold water for 60 seconds to flush everything through.
This is one of the most effective garbage disposal cleaning tips for routine maintenance safe for all disposal types and drain lines.
Step 5: Run Cold Water for 30 Seconds
Always finish any cleaning cycle by running cold water through the disposal for 30 seconds. This flushes any loosened debris fully through the drain and out of the unit.
You can read about: How to Unjam a Garbage Disposal
How to Remove Garbage Disposal Odors
If the basic clean doesn’t fully clear the smell, these targeted methods work for stubborn odors.
Citrus Peels
Cut a lemon, lime, or orange into quarters. With cold water running, turn the disposal on and feed the citrus pieces through one at a time. The citrus oils coat the interior surfaces and leave a clean, fresh scent. The peel also gently scrubs the grinding chamber walls as it goes through.
This is one of the easiest and most pleasant garbage disposal cleaning tips for odor removal. Use it once a week as a finishing step after the regular clean.
Salt and Ice Method
This method deodorizes and cleans the impellers at the same time. Pour one cup of coarse salt or kosher salt into the drain. Add two cups of ice cubes on top. Turn the disposal on without running water and let it run for 30 to 60 seconds.
The ice and salt together scour the interior surfaces of the grinding chamber, breaking up grease and food film that hot water alone won’t dissolve. Clean garbage disposal with ice is one of the most recommended methods by plumbers for removing stubborn buildup.
After the ice is fully ground, run cold water for 30 seconds to flush everything out.
Baking Soda Overnight
For persistent odors, pour two to three tablespoons of baking soda into the drain and leave it overnight with the disposal off. The baking soda absorbs odor-causing compounds from the surfaces inside the unit. Run cold water and turn the disposal on in the morning to flush it through.
How to Deep Clean a Garbage Disposal
A deep clean goes further than the weekly routine. Do this once a month or whenever you notice performance or odor issues that the basic clean doesn’t fully resolve.
Clean the Grinding Chamber Manually
With the unit unplugged and power confirmed off, use a flashlight to inspect the inside of the grinding chamber. Use a long-handled disposal cleaning brush never your hand to scrub the walls of the chamber, the impellers, and the drain opening.
Apply dish soap to the brush and work in circular motions around the full interior. Rinse by running water and then running the disposal for 30 seconds.
Cleaning a Waste Disposal Unit with Vinegar Ice Cubes
Freeze white vinegar in an ice cube tray. Once frozen, add the vinegar cubes to the disposal along with one cup of coarse salt. Turn the disposal on without water. The vinegar ice cubes combine the scouring action of the salt-and-ice method with the deodorizing and antibacterial properties of vinegar.
This is particularly effective for cleaning waste disposal unit surfaces that have grease buildup. The vinegar cuts through fat while the ice scrubs.
Scrub the Drain Rim and Flange
The metal or rubber ring where the disposal meets the sink drain accumulates grime that the disposal itself doesn’t touch during operation. Scrub the flange with an old toothbrush and dish soap. Rinse with hot water.
How Often Should You Clean a Garbage Disposal?
Frequency depends on usage, but here’s a practical schedule:
Weekly: Soap and hot water flush, baking soda and vinegar rinse, splash guard scrub. This 10-minute routine prevents most buildup.
Monthly: Deep clean including ice and salt scrub, citrus peel treatment, manual brush cleaning of the grinding chamber.
Immediately after: Processing large quantities of food scraps, putting anything greasy through the disposal, or noticing any odor.
Households that use the disposal daily should err toward weekly deep cleans rather than monthly.
What NOT to Put in a Garbage Disposal
Part of garbage disposal maintenance is knowing what damages the unit and worsens odor problems.
Grease, oil, and fat. These coat every surface inside the disposal and solidify as they cool. Even liquid cooking oil solidifies inside the drain line. Dispose of fats in a sealed container in the trash.
Fibrous vegetables. Celery, artichokes, corn husks, and asparagus have long fibers that wrap around the impellers and jam the unit.
Starchy foods. Potato peels, pasta, and rice expand with water and form a paste that clogs the grinding chamber and drain line.
Eggshells. A persistent myth claims eggshells sharpen disposal blades. They don’t — disposals don’t have traditional blades. Eggshell membrane wraps around the impellers and causes jams.
Pits and hard seeds. Cherry pits, avocado pits, and peach pits are too hard for residential disposal impellers. They damage the grinding mechanism and create noise.
Coffee grounds. They seem fine but accumulate inside drain traps and cause sludge buildup over time.
Bones. Small fish bones are occasionally acceptable. Chicken bones, pork chop bones, and anything similar will jam or damage most residential disposals.
Chemical drain cleaners. Products like Drano are too harsh for disposal rubber components. Use enzyme-based cleaners for the disposal drain line if needed.
Common Garbage Disposal Cleaning Mistakes
These are the habits that make odor and performance problems worse:
Only cleaning the visible top surface. The real buildup is on the underside of the splash guard and inside the grinding chamber. Surface cleaning doesn’t fix odor.
Using hot water during operation. Hot water melts grease briefly but then allows it to re-solidify further down the drain line. Always run cold water when the disposal is processing food it keeps grease solid so the disposal can grind and flush it.
Pouring bleach directly into the disposal. A little diluted bleach for sanitizing is fine occasionally. Regular or heavy bleach use damages rubber components and corrodes metal parts.
Not cleaning after every use. Letting food residue sit until cleaning day means it’s already decomposing. A 30-second cold water flush after every use prevents most of the buildup that causes odor.
Ignoring the drain line. The disposal connects to the drain trap and line. If the drain line has buildup, odors come from there even after cleaning the disposal. An enzyme-based drain cleaner monthly keeps the line clear.
Garbage Disposal Maintenance Tips
Good habits extend the life of the unit and reduce how often deep cleaning is necessary.
Run cold water before, during, and after use. Cold water keeps grease solid for better grinding and flushes debris fully through the drain line after the disposal turns off.
Run the disposal regularly. A disposal that sits unused for days allows rust to form on the impellers and can cause the motor to seize. Even running it with just water every couple of days keeps things moving.
Cut food into small pieces before feeding them in. Large chunks stress the motor and create more buildup. Small pieces process faster and more completely.
Use enzyme-based drain treatments monthly. These products contain bacteria that break down organic matter inside the drain line. They’re safe for all pipe types and are far gentler than chemical cleaners. Pour them in before bed and let them work overnight.
Check the rubber splash guard regularly. This part wears out faster than the disposal itself. If it’s cracked, torn, or permanently stained despite cleaning, replace it. Replacement splash guards cost $5 to $15 and snap into the drain opening in minutes.
How to Clean a Garburator (Same Process, Different Name)
If you’re searching how to clean garburator, you’re looking for exactly the same information. “Garburator” is the Canadian term for a garbage disposal where the unit, cleaning process, and maintenance steps are identical. Everything in this guide applies.
The baking soda and vinegar method, the ice and salt scrub, the splash guard cleaning, and the citrus peel treatment all work the same way regardless of which term you use for the unit.
When to Call a Plumber
How to clean a garbage disposal covers most routine issues. But some problems need a licensed plumber:
Persistent leaking. Water leaking from the bottom of the disposal indicates a failed internal seal. Cleaning won’t fix a seal if the unit needs repair or replacement.
Humming but not spinning. The motor is getting power but the grinding plate is jammed. You can sometimes free a jam with the hex key port at the bottom of the unit. If that doesn’t work, a plumber can assess whether the plate, motor, or both need service.
Electrical issues. If the reset button trips repeatedly or the unit won’t power on at all, the problem is electrical. Don’t attempt electrical work without the right tools and knowledge.
Persistent drain backup. If the sink backs up even with the disposal running and no obvious clog, the problem may be in the drain line or trap below the disposal, not the disposal itself.
Unit over 10 years old with recurring issues. Disposals typically last 8 to 15 years. An older unit with repeated problems is usually more cost-effective to replace than repair.
For homeowners the service of Garbage Disposal Installation and Repair in Eagle Rock is worth calling for any issue beyond routine cleaning. Derks Plumbing handles disposal repairs, replacements, and drain line clearing with licensed plumbers and upfront pricing on every job.

Conclusion
How to clean a garbage disposal properly comes down to consistency. A 10-minute weekly routine scrubbing the splash guard, flushing with baking soda and vinegar, and finishing with cold water prevents the buildup that causes bad smells and slow drainage. Monthly deep cleans with ice, salt, and citrus keep the unit performing like new.
Avoid putting grease, fibrous vegetables, starchy foods, and bones through the disposal. Run cold water every time you use it. Replace the splash guard when it wears out.
These habits keep a disposal running cleanly for its full lifespan and save you from the unpleasant job of dealing with a seriously neglected unit later.
FAQs
Q: How to clean a garbage disposal that smells really bad?
Start with the splash guard scrub the underside with a toothbrush and dish soap. Then do a baking soda and vinegar flush, followed by the ice and salt method. If the odor persists after all three steps, the drain line below the disposal may be the source an enzyme drain cleaner used overnight often clears it.
Q: How often should I clean a garbage disposal?
Weekly for the basic routine splash guard scrub, dish soap flush, baking soda and vinegar. Monthly for a full deep clean including the ice and salt scrub and manual brush cleaning of the grinding chamber. Daily: run cold water for 30 seconds after every use.
Q: Is it safe to clean a garbage disposal with baking soda and vinegar?
Yes this is one of the safest and most effective cleaning methods. The fizzing reaction loosens food residue and deodorizes the interior without damaging rubber seals, metal parts, or drain pipes.
Q: Can I use bleach to clean a garbage disposal?
Use it sparingly and diluted if you use it at all. Regular bleach corrodes rubber components inside the unit and can damage plastic drain pipes over time. Baking soda, vinegar, and dish soap are safer and just as effective for routine cleaning.
Q: Why does my garbage disposal still smell after cleaning?
The most common reason is a splash guard that wasn’t cleaned on the underside. That rubber flap traps food residue and bacteria on its underside, which water from above never reaches. Remove and scrub it directly. If the smell persists after that, check the drain trap under the sink odors from the P-trap are often mistaken for disposal odors.