If your well pump keeps short cycling, loses pressure, or will not turn on, the pressure switch is often the cause. This small part controls when your pump starts and stops. When it fails, your water system cannot work right. Testing it early can save your pump and your wallet.
How to test a pressure switch on a well is a simple process when done the right way. You check power, pressure response, and contact action in a clear order. This guide gives direct steps, real examples, and plain advice so you know what to do and when to stop.
What Is a Well Pressure Switch?
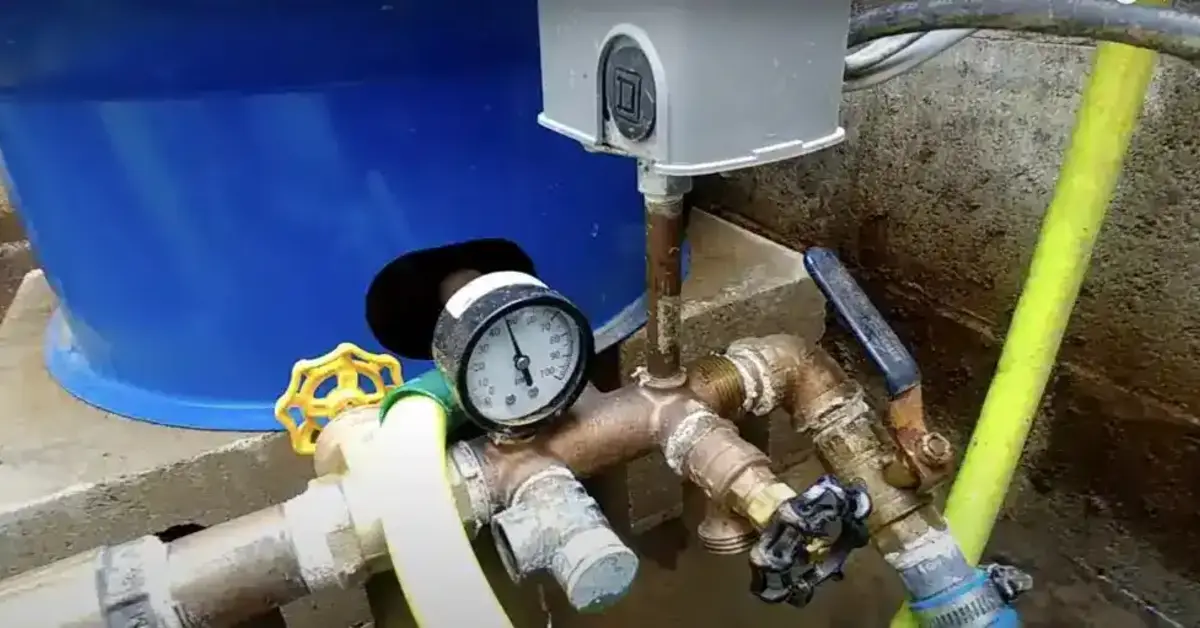
A well pressure switch is the brain of your home water system. It tells the pump when to start and when to stop. Without it, your pump would not know when you need water. It sits on a small pipe near your pressure tank.
The switch has a set of springs and electrical contacts inside. When water pressure drops, the springs push the contacts together. This sends power to the pump to pull water from the ground. When the tank is full, the pressure pushes the contacts apart to stop the pump.
Most switches work on a 30/50 or 40/60 range. These numbers stand for pounds per square inch or PSI. For example, a 40/60 switch turns the pump on at 40 PSI. It turns it off when the pressure hits 60 PSI. This cycle keeps your home’s water pressure steady.
Signs Your Well Pressure Switch May Be Failing
You might notice well pressure switch problems before the water stops completely. One common sign is a clicking sound. If you hear a rapid click-click-click near the tank, the switch is struggling. This often means the contacts are worn out or dirty.
Another sign is low water pressure in the house. Your shower might feel weak even when the pump is running. You might also see the pump staying on for too long. If the pump never shuts off, the switch might be stuck in the “on” position.
Sometimes the water might pulse or sputter at the tap. This could mean the switch is turning on and off too fast. We call this short cycling. It is very hard on your pump motor. You should check the pressure switch on well systems right away if this happens.
Safety Precautions Before Testing
Safety is the most important part of this job. You are working with both water and high voltage electricity. These two do not mix well. Always wear rubber-soled shoes to stay safe. Make sure the floor around the well tank is dry.
Go to your main electrical panel first. Find the breaker for the well pump. Flip it to the “off” position. Use a non-contact voltage tester to be 100% sure the power is out. Check the wires at the switch before you touch anything.
Never try to adjust the switch while the power is on. The sparks from the contacts can be dangerous. Also, do not stick metal tools into the switch while it is live. Following these rules keeps you safe while testing a pressure switch.
Tools and Materials You’ll Need
You do not need many tools for this task. Most homeowners already have these in the garage. Gather them before you start so you do not have to stop mid-way.
- A flathead or Phillips screwdriver.
- A pair of needle-nose pliers.
- A multimeter to check for power and continuity.
- An air pressure gauge like the one used for car tires.
- A small piece of fine-grit sandpaper.
- A wrench or a socket set.
Having the right tools makes the job much easier. A multimeter is very helpful for finding electrical shorts. The sandpaper is great for cleaning the metal contacts inside the switch.
Step-by-Step: How to Test a Pressure Switch on a Well
Follow these steps to find out what is wrong. Work slowly and check each part of the system as you go.
1. Perform a Visual Inspection
Remove the plastic or metal cover on the switch. Look at the four metal contact points. Are they black or pitted? This is a sign of carbon buildup. Carbon keeps the electricity from flowing correctly.
Check the wires for any loose connections. If a wire is wobbly, the pump might not get enough power. Look for signs of ants or bugs inside the housing. Insects love the warmth of the electrical switch and can cause it to fail.
2. Clean the Contact Points
If the contacts look dirty, you can clean them. Use your fine-grit sandpaper to gently rub the metal surfaces. You want to see shiny metal again. Do not over-sand them or you might remove too much material.
Once they are clean, blow out any dust or debris. This simple fix often solves pressure switch problems without buying new parts. Many people think they need a new switch when they just need a cleaning.
3. Check the Sensing Tube
There is a small pipe called a pigtail or nipple under the switch. This tube carries water to the switch so it can sense the pressure. Over time, sediment or rust can clog this tube.
If the tube is clogged, the switch cannot “feel” the water pressure. It might think the pressure is high when it is actually low. Unscrew the switch and check the hole at the bottom. If it is full of gunk, clean it out with a thin wire.
4. Test for Continuity
Use your multimeter for this part of testing a pressure switch. Set the meter to the continuity or “ohms” setting. With the power off, touch the probes to the terminals that the contacts bridge.
If the contacts are touching, the meter should beep or show zero. If it shows an “OL” or no reading, the electricity cannot pass through. This means the switch is broken and needs to be replaced.
5. Check the System Voltage
Turn the power back on carefully. Set your multimeter to AC voltage. Be very careful not to touch the metal terminals with your hands. Touch the probes to the “line” terminals where power comes in.
You should see 120 or 240 volts depending on your system. Next, check the “load” terminals that go to the pump. If the contacts are closed but there is no power at the load side, the switch is bad.
You can read about: How to Install a Well Pressure Tank
Troubleshooting After Testing
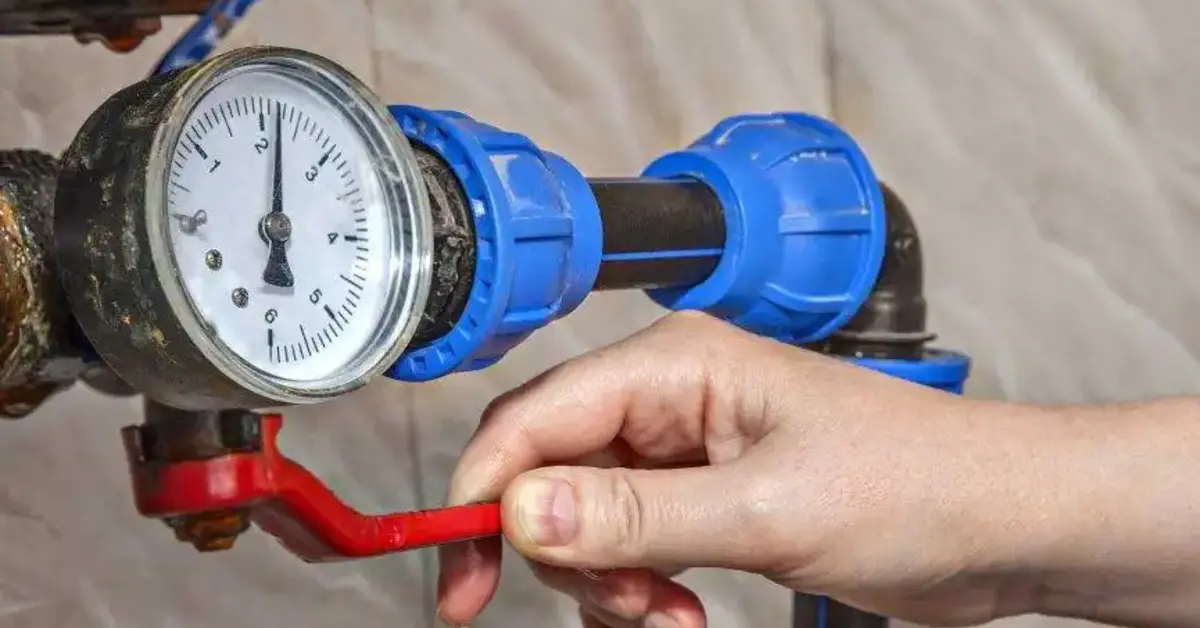
If the switch seems fine but the pump still acts up, look at the gauge. A broken pressure gauge is a very common issue. It might get stuck at 50 PSI even if the tank is empty. If the gauge does not move when you run water, replace it.
Check the air pressure in your well tank next. Turn off the pump and drain all the water. Use your tire gauge on the air valve at the top of the tank. The air pressure should be 2 PSI lower than your switch’s turn-on point.
If your tank is waterlogged, the pump will turn on and off every few seconds. This is not always a switch problem. It usually means the air bladder inside the tank has a hole in it. In this case, you may need a new tank rather than a new switch.
Maintenance Tips to Prevent Pressure Switch Failure
Regular care can make your switch last for many years. Check the contacts once a year for any bugs or dust. Keeping the area around the well tank clean and dry helps a lot. Moisture can cause the metal parts to rust faster.
Listen to the sounds your system makes. If you hear it clicking more than usual, take a look under the cover. Catching a small problem early prevents a total loss of water. It also protects your expensive well pump from burning out.
You should also check the pigtail pipe every few years. If you have hard water or iron, it will clog more often. Cleaning this pipe is a great way to keep your system accurate. A clean switch is a happy switch.
| Common Problem | Possible Cause | Quick Fix |
| Pump won’t start | Power is off or bad switch | Check breaker and test for voltage |
| Constant clicking | Dirty or pitted contacts | Clean contacts with sandpaper |
| Low water pressure | Clogged sensing tube | Clean out the pigtail pipe |
| Pump won’t stop | Stuck switch or bad gauge | Replace switch or gauge |
When You Shouldn’t DIY
Not every plumbing job is for the weekend warrior. If you are not comfortable with electricity, please do not touch the switch. High voltage can be deadly if you make a mistake. It is better to stay safe and call a pro.
If you have tested the switch and the pump still won’t run, you might have a deeper issue. The pump deep in the ground could be the problem. Pulling a well pump requires special tools and heavy lifting.
For help with your well system, you can contact Derks Plumbing. We offer professional Plumbing Services In Los Angeles to help with any well or pipe issues. Our team has the tools to find the problem fast and fix it right the first time.
Conclusion
Knowing how to test a pressure switch on a well is a vital skill for any homeowner with a well. It helps you stay in control of your water supply. Most issues come down to dirty contacts or a clogged tube. By following these steps, you can fix many common problems yourself.
Remember to always put safety first by turning off the power. Keep your tools handy and work through the steps one by one. If you ever feel stuck, a professional plumber is only a phone call away. Taking care of your switch today ensures you have plenty of water for tomorrow.
FAQs
How do I know if I need to change a pressure switch on a well?
You should change pressure switch on well units if the contacts are badly burned. If cleaning them does not work, it is time for a new one. Also, replace it if the plastic housing is cracked or melted.
What is the normal pressure for a water well pressure switch?
Most homes use a 30/50 or 40/60 PSI setting. This means the water stays between those two numbers. If your pressure is below 20 PSI, your shower will feel very weak.
Can a bad pressure switch cause no water?
Yes, if the switch fails to close the contacts, the pump will never get power. This results in no water flowing to your house. Always check the breaker first, then the switch.
Why is my well pump clicking on and off rapidly?
This is called short cycling. It is usually caused by a waterlogged tank or a very dirty switch. Check the air pressure in your tank and clean the switch contacts to fix it.
How much does it cost to replace a well pressure switch?
The part itself is usually between $20 and $50. If you hire a pro, the labor might cost a bit more. It is one of the most affordable parts of a well system to fix.