SharkBite fittings are a fast way to join copper pipes without the need for heat or glue. You simply push the fitting onto the pipe to create a strong and waterproof seal instantly. These fittings work well for both permanent repairs and quick fixes when you do not have time to solder. It is the best solution for anyone who wants a professional result without the heavy tools or the risk of fire.
Knowing how to install sharkbite on copper is a vital skill that is much simpler than learning what is a drain board for a new sink. You just need to cut the pipe, clean the edges, and push the fitting until it clicks into place. This method saves you hours of work and keeps your home safe from water damage.
What is SharkBite?
A SharkBite fitting is a type of push-to-connect plumbing joint. It uses a special design to grip pipes and seal them without any extra materials. The body is made of lead-free brass which is very strong. Inside the fitting, there is a stainless steel grab ring with small teeth. These teeth bite into the copper to hold it tight.
There is also an EPDM O-ring inside that creates the seal. When you push the copper pipe into the fitting, it passes through the O-ring. This prevents water from leaking out. SharkBite fittings are approved for use behind walls and even underground. They are a top choice for experts and homeowners who want a leak-free home.
Materials and Tools Needed
To get the job done right, you need a few basic tools. Having the right gear makes installing sharkbite on copper much smoother.
- Rotary Pipe Cutter: This tool gives you a square and clean cut on the copper.
- SharkBite Deburr and Gauge Tool: This helps you remove sharp edges and mark the depth.
- Permanent Marker: Use this to mark how far the pipe needs to go in.
- Clean Cloth: To wipe away any dirt or grease on the pipe.
- SharkBite Fittings: Ensure you have the right size for your copper line.
Step-by-Step: how to install sharkbite on copper
Follow these steps for a perfect seal every time. Do not skip the prep work because it is the most important part of the job.
1. Shut Off the Water
Before you start using sharkbite on copper, turn off the main water valve. Open the lowest faucet in your house to drain the lines. This keeps your workspace dry and clean.
2. Cut the Copper Pipe
Use your rotary pipe cutter to cut the pipe. You must make sure the cut is perfectly square. Do not use a hacksaw for this job. A hacksaw leaves jagged edges that can damage the internal parts of the fitting. Rotate the cutter around the pipe and tighten it slightly after each turn until the pipe snaps.
3. Deburr and Clean
This step is where most people make mistakes with a shark bite fitting copper project. Use your deburring tool to smooth the inside and outside edges of the cut pipe. There should be no sharp bits or burrs left. Sharp edges will cut the O-ring inside the SharkBite and cause a leak. Wipe the end of the pipe with a clean cloth. The pipe must be free of paint, grease, or old solder.
4. Mark the Insertion Depth
You cannot just guess how far to push the pipe. Use the SharkBite depth gauge tool to find the correct depth for your fitting size. Place the tool over the end of the pipe and use your marker to draw a line. This line tells you when the pipe is fully seated inside the fitting.
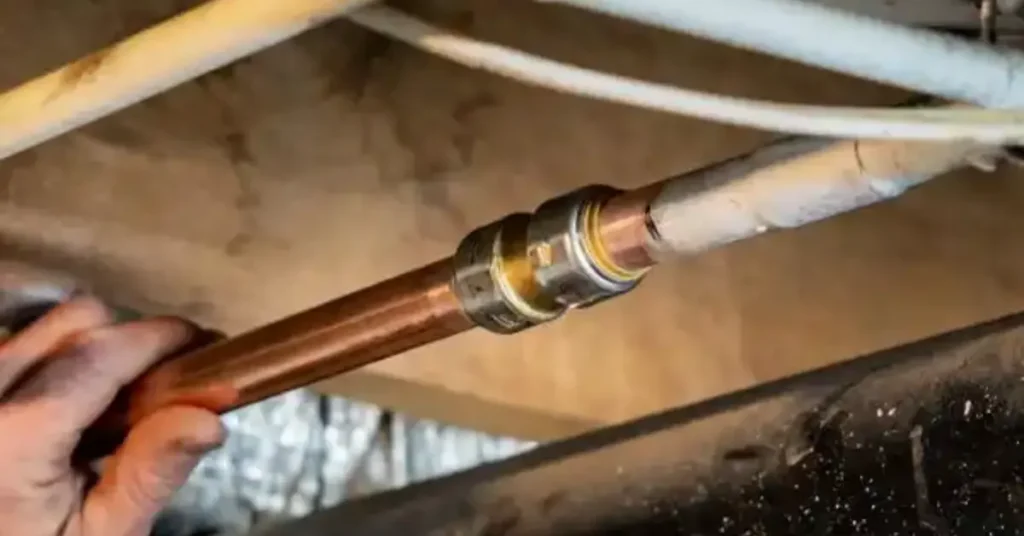
5. Push the Fitting On
Now you are ready for the actual sharkbite installation copper step. Push the fitting onto the pipe. You will feel some resistance as it passes the O-ring. Keep pushing until the edge of the fitting reaches the mark you made. If the mark is not touching the fitting, it is not deep enough.
6. Verify the Connection
Give the fitting a firm tug. It should stay firmly in place. The teeth in the grab ring should be locked onto the copper.
Pipe Size | Insertion Depth (1st Gen) | Insertion Depth (SharkBite Max) |
1/2 inch | 15/16 inch | 1 inch |
3/4 inch | 1-1/8 inch | 1-1/4 inch |
1 inch | 1-5/16 inch | 1-1/2 inch |
You can read about: How to Fix Pinhole in Copper Pipe
Checking for Leaks
Once you finish installing shark bite on copper, you must test your work. Turn the water back on slowly. Do not blast the pressure all at once. Watch the fitting closely for a few minutes. If you see any drips, you may not have pushed the pipe in far enough.
Check the fitting again after an hour. Sometimes a slow leak takes time to show up. Use a dry paper towel to wipe the joint. If the towel stays dry, your work is a success. If you find a leak, you might need to remove the fitting and check for scratches on the pipe.
Troubleshooting Common Issues
Even with a simple install sharkbite on copper project, things can go wrong. Here are the most common issues and how to fix them.
The Fitting Leaks Immediately
This usually happens because the pipe was not deburred. A sharp edge can nick the O-ring. If the O-ring is torn, the fitting is ruined. You will need a new fitting and a fresh cut on the pipe. Another cause is not pushing the pipe in all the way. Always use the depth mark to be sure.
The Pipe is Scratched
If the copper pipe has deep scratches on the outside, the O-ring cannot seal properly. Do not use sandpaper to clean the pipe near where the fitting will sit. Sandpaper can leave small grooves that allow water to seep out. Only use a clean cloth to wipe the pipe.
The Fitting Spins
It is normal for a SharkBite fitting to spin on the pipe after it is installed. This does not mean it is leaking. The design allows the fitting to rotate. This is actually helpful if you need to align a valve or a tee in a tight space.
Removing a Fitting
If you make a mistake, you can remove the fitting. Use the SharkBite disconnect clip or tongs. These tools press down on the release collar. This pulls the teeth back and lets you slide the pipe out. You can reuse the fitting if the O-ring is still in good shape.
Advantages of Using SharkBite
There are many reasons why people choose to install sharkbite on copper instead of soldering.
- No Fire Risk: You do not need a torch. This makes it safer in tight spaces or near wood studs.
- Works on Wet Pipes: You can install these fittings even if water is still dripping. Solder requires a bone-dry pipe.
- Fast Repairs: You can fix a burst pipe in minutes. This is great for emergencies.
- No Chemicals: You do not need flux or glue. This keeps your drinking water cleaner.
- Versatile: SharkBite connects copper to PEX or CPVC easily. It is the perfect bridge between different pipe types.
Conclusion
Learning how to install sharkbite on copper is one of the best ways to handle home plumbing. It removes the stress of soldering and gives you a reliable seal. Just remember to cut the pipe square and use your depth gauge. These small steps make the difference between a dry house and a wet mess. If you follow this guide, you will have a professional connection in seconds.
If you ever feel unsure about a major project, it is okay to ask for help. For complex tasks like a full copper pipe repair in Eagle Rock, reaching out to the experts at Derks Plumbing is a smart move. We can ensure your entire system is up to code and running smoothly. Whether you do it yourself or call a pro, doing the job right is what matters most for your home.
FAQs
Can I use SharkBite on painted copper?
No. You must remove all paint from the pipe where the fitting will sit. The O-ring needs a smooth metal surface to seal. Use a mild abrasive only if necessary, but try to wipe it clean first.
Are SharkBite fittings permanent?
Yes. They are rated for permanent use in residential and commercial plumbing. They can last as long as the pipe itself if they are installed correctly.
Can I use SharkBite for gas lines?
No. SharkBite push-to-connect fittings are only for water and hydronic heating. Never use them for natural gas or propane.
Do SharkBite fittings restrict water flow?
They have a slightly smaller inside diameter than the pipe. For most home uses, you will not notice any change in water pressure.
How many times can I reuse a fitting?
You can reuse them several times for testing. However, for a permanent install, it is best to use a new fitting or one that has not been moved much. Always check the O-ring for damage before reusing.