

To remove an anode rod from a water heater, turn off the power or gas supply first. Shut the main cold water valve and drain three to five gallons of water from the tank. Use a 1-1/16 inch socket with a breaker bar to turn the top hex bolt counterclockwise until it loosens.
Once the bolt spins freely, pull the old rod straight up and out of the tank top. Learning how to remove anode rod from water heater tanks keeps your unit working safely and prevents premature rust damage.
What Is an Anode Rod in a Water Heater?
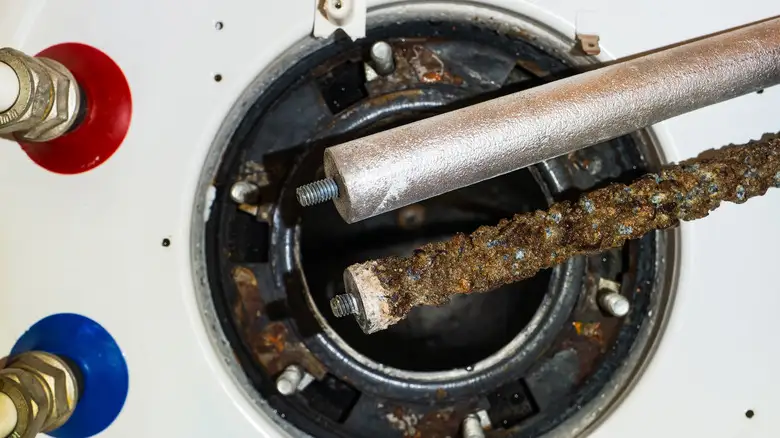
An anode rod is a metallic core wire wrapped in aluminum, magnesium, or zinc that hangs inside your water heater tank. Plumbers often call it the “sacrificial rod” because its sole purpose is to corrode in place of the steel tank lining.
Water contains naturally occurring dissolved minerals and oxygen. Over time, these elements trigger an electrochemical reaction called electrolysis that eats away at metal. Because magnesium and aluminum are chemically more reactive than steel, the corrosive elements attack the anode rod first.
When the rod dissolves completely, those corrosive elements turn their focus to the inner steel wall of your water heater. Once the steel rusts through, the tank bursts, creating an expensive flood. Replacing a minor part every few years shields your tank interior and adds years to your system’s lifespan.
You can read about: What Does an Anode Rod Do
Signs It’s Time to Remove or Replace the Anode Rod
You do not need to pull the rod out every month just to check on it. Your plumbing system will give you clear warning signals when the rod stops protecting your tank:
Smelly Hot Water: A persistent rotten egg odor coming only from your hot water taps indicates sulfur-reducing bacteria reacting with a degrading magnesium rod.
Rusty or Discolored Water: Brown, red, or yellowish tint in your hot water means the sacrificial metal is gone, and the water is now rusting the steel tank wall.
Metallic Taste: A strong iron or metal taste when using hot water for cooking or drinking signals heavy corrosion inside the vessel.
Popping or Rumbling Noises: As the sacrificial rod decomposes, bits of metal scale drop to the bottom of the tank. Mineral sediment bakes on the lower heating element or gas burner floor, creating loud popping sounds.
Small Leaks Around the Hex Head: Discoloration or moisture around the top plug on the upper jacket indicates the threads have rusted through or loosened.
Tools You’ll Need to Remove an Anode Rod
Gather your tools before starting so you do not get stuck halfway through the job with a partially drained heater:
1-1/16 Inch Deep Socket: Almost all residential water heater hex head plugs require this specific socket size.
1/2-Inch Drive Breaker Bar: A standard ratchet usually will not provide enough leverage to break factory-tightened threads loose.
1/2-Inch Impact Wrench (Optional): An cordless impact wrench breaks stubborn factory seals instantly without spinning the entire tank.
Garden Hose: Needed to hook up to the drain valve at the bottom of the tank.
Flathead Screwdriver: Helpful for prying off plastic top caps or scraping away spray-foam insulation covering the hex plug.
Teflon Thread Tape: Required to seal the threads of your replacement rod to prevent future leaks.
Cheater Pipe: A 2-foot steel pipe slid over your breaker bar for extra physical leverage.
Safety Steps Before Removing the Anode Rod
Working around pressurized hot water and electricity requires strict safety precautions. Skip one step and you risk personal injury or a flooded floor.
Cut the Power Source: For an electric unit, flip the dedicated breaker switch to OFF at your main circuit panel. For a gas unit, turn the gas control valve knob on the front to PILOT or OFF.
Shut Off the Cold Water Supply: Turn the cold water lever valve on the top inlet pipe clockwise until it stops completely.
Relieve Internal Tank Pressure: Open any hot water faucet inside your home (like a bathroom sink) and leave it open. Alternatively, lift the lever on the Temperature and Pressure (T&P) relief valve on the side of the tank.
Cool the Water: Allow the tank to sit for at least 1 to 2 hours, or run the hot water until it turns lukewarm so you do not burn your hands during removal.
How to Remove an Anode Rod from a Water Heater (Step-by-Step)
Follow this precise sequence for removing anode rod from water heater setups safely and efficiently:
Step 1: Drain a Small Amount of Water
Do not drain the entire vessel yet. Keeping the tank full of water adds heavy weight (around 300 to 400 pounds), which prevents the heater from twisting on the floor when you apply heavy torque to the top hex plug.
Attach your garden hose to the bottom drain valve and run the open end outside or into a bucket. Open the drain valve and let out 3 to 5 gallons of water. This lowers the internal water line below the top cover so water does not spill out when the rod is unthreaded.
Step 2: Locate the Hex Plug
Look at the top plate of your water heater. On most models, you will see an exposed 1-1/16 inch hex head bolt sitting flush against the metal shell. If you do not see it, check under the plastic caps on top of the unit or beneath the top layer of foam insulation.
Step 3: Break the Thread Seal
Fit your 1-1/16 inch deep socket securely onto the hex head. Attach your breaker bar. Hold the bar steady and turn it counterclockwise.
Apply firm, steady pressure. If the plug refuses to budge, do not panic—factory threads are tightly torqued and often sealed with thread compound.
Step 4: Extract the Rod
Once the initial tight seal breaks open, switch from your breaker bar to a standard hand ratchet. Turn the hex head until the threads spin freely. Carefully lift the bolt head straight up.
Pull the long metal rod out of the top of the tank. If your ceiling height is limited, bend the old rod as you pull it out.
What If the Anode Rod Is Stuck?
A hot water heater anode removal job often hits a wall when rust welds the steel threads directly to the tank opening. Here is how pros break loose a stubborn plug:
Use an Electric Impact Wrench: A 1/2-inch cordless impact wrench uses rapid rotational strikes. It vibrates the rusty threads apart instantly without applying continuous twisting force that could rupture the internal plumbing pipes.
Apply Penetrating Oil: Spray a heavy dose of penetrating fluid (like PB Blaster or Liquid Wrench) around the base of the hex plug. Let it soak into the threads for 20 to 30 minutes before trying again.
Extend Your Leverage: Slide a 2-foot metal cheater pipe over the handle of your breaker bar. The extended length multiplies your physical strength, making it much easier to remove water heater anode bolts.
Tap with a Mallet: Place the socket over the bolt and tap the top of the socket firmly with a rubber mallet. The downward shock helps crack the hardened mineral deposits inside the internal thread grooves.
Can You Remove an Anode Rod Without Draining the Tank?
Yes, you can remove an anode rod without completely draining the tank, but you must lower the water level slightly.
If you attempt changing an anode rod on a water heater while the tank is completely full and under household water pressure, water will jet out of the top opening the moment the final thread releases.
You only need to drain 3 to 5 gallons through the lower spigot. Closing the cold water inlet valve and opening a hot water tap upstairs stops incoming pressure and drains just enough space at the top to keep your work area dry.
How to Install a New Anode Rod
Putting in a new part is fast once the old component is out:
Select the Right Material: Choose a magnesium rod for soft water areas, an aluminum/zinc alloy rod if your water smells like sulfur, or a powered titanium anode for a permanent maintenance-free fix.
Wrap the Threads: Wrap the top threads of the new hex bolt with 4 to 5 turns of Teflon thread tape in a clockwise direction.
Insert the New Rod: Lower the new rod straight down into the opening. If you have low ceiling clearance in a basement or closet, install a flexible segmented anode rod that bends like chain links during insertion.
Hand Tighten First: Thread the plug into the opening by hand for the first few turns to ensure you do not cross-thread the delicate fittings.
Torque with Socket: Use your socket wrench to tighten the bolt securely clockwise until it sits snug against the top shell.
Refill and Test: Turn off the lower drain valve, open the main cold water inlet valve, and let the tank fill. Leave an upstairs hot faucet open until water flows out smoothly without sputtering air. Check the top bolt for any signs of water leaks.
How Often Should You Replace an Anode Rod?
Inspect your core sacrificial wire once every 2 years. Most standard residential units require a full replacement every 3 to 5 years.
How fast the metal wears down depends heavily on your local water quality:
Hard Water Regions: High concentrations of dissolved minerals accelerate corrosion, reducing component lifespan down to 2 or 3 years.
Water Softeners: Salt-based water softeners introduce sodium into the supply, which drastically speeds up the chemical reaction. Check your unit every 12 months if you use a water softener.
Powered Titanium Rods: Installing an electronic powered anode rod eliminates traditional wear altogether. These units use minor electrical currents to stop rust and can last up to 20 years without needing replacement.
Common Mistakes to Avoid
Avoid these frequent DIY pitfalls to protect your plumbing equipment from accidental damage:
Draining the Entire Tank First: A lightweight empty tank spins around on your floor when you crank down on a tight breaker bar, which can snap your hard metal pipe connections.
Forgetting Teflon Tape: Skipping thread sealant on the new hex bolt leads to slow micro-leaks that rust out the top outer shell of your heater over time.
Using the Wrong Socket Size: Attempting to use adjustable pliers or an incorrect socket size rounds off the hex bolt corners, making future servicing nearly impossible.
Leaving Power On While Empty: Leaving the electric circuit breaker ON while water levels are low will instantly burn out the upper electrical heating element in seconds.
When Should You Replace the Entire Water Heater Instead?
Changing out internal parts helps extend overall service life, but it cannot revive a dead tank. Consider purchasing a brand new system if you notice these warning signs:
Structural Tank Leaks: If water pools around the bottom base of the unit from an internal shell fracture, no new rod will stop the leak.
Age Past 10-12 Years: Most traditional storage tanks have an average lifespan of 8 to 12 years. Spending money on repairs for an older system is rarely cost-effective.
Heavy Sediment Buildup: If thick mineral crust fills the bottom half of the tank, heating efficiency drops drastically and causes loud knocking noises that signal structural metal fatigue.
Professional Water Heater Maintenance
While home plumbing enthusiasts can handle basic maintenance steps, some situations call for licensed experts. Professional plumbers carry specialized high-torque tools, commercial air-impact units, and specialized replacement parts that make quick work of severely rusted hardware.
Regular professional checkups include full system flushes, safety valve testing, burner cleaning, and electrical heating element testing. Scheduling routine care every couple of years prevents unexpected home flooding, keeps your hot water clean, and saves hundreds of dollars in early equipment replacement costs.
Conclusion
Knowing how to remove anode rod from water heater tanks gives homeowners a simple, cost-effective way to extend equipment life and maintain clean domestic water. By shutting down power, turning off incoming water, draining a few gallons, and using a 1-1/16 inch socket with proper leverage, you can easily remove the worn rod and install a fresh core before rust damages your steel tank.
If your system’s threads are completely frozen or your tank shows signs of structural failure, turn to experienced professionals for help. For expert maintenance, tank replacements, or full Water Heater Installation in Eagle Rock, trust the team at Derks Plumbing to keep your hot water system running safely year-round.

FAQs
What size socket takes off an anode rod?
Nearly all residential storage tanks use a standard 1-1/16 inch deep socket to fit over the top hex head plug.
Which way do you turn to loosen an anode rod?
Turn the bolt counterclockwise to loosen it. Remember the classic plumbing rule: ” lefty-loosey, righty-tighty.”
What happens if I never replace the anode rod?
Once the sacrificial metal dissolves completely, corrosive elements in the water eat away at the tank’s interior steel wall, causing severe rust and premature tank failure.
Why is my new anode rod turning black?
Black discoloration is typically caused by harmless chemical reactions with heavy mineral content or sulfur in your well or municipal water supply.




