A leaking toilet base is not just messy it can rot your floor and spike your water bill. The fix is often cheaper and easier than you think. A $10 wax ring and a couple of hours can save you from a much bigger repair bill down the road. Most homeowners skip this fix because they think it’s complicated. It’s not.
Knowing how to install a toilet wax ring is a skill every homeowner should have. This guide walks you through every step clearly, including what to buy, what tools you need, and the mistakes you must avoid. Whether you’re doing a full toilet reset or a quick repair, this article covers it all.
What Is a Toilet Wax Ring?
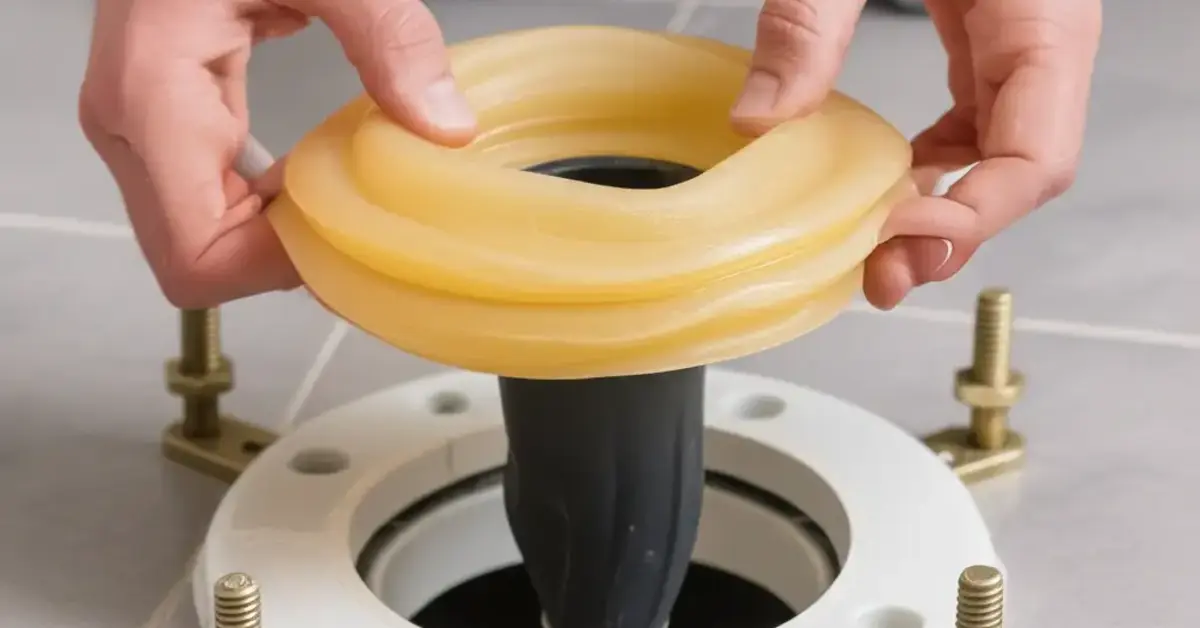
A toilet wax ring is a thick, donut-shaped seal made from beeswax or synthetic wax. It sits between the bottom of your toilet and the floor flanges the round drain fitting bolted to your floor.
Its job is simple: create a watertight, gas-tight seal so waste flows down the drain and nothing leaks out. Without it, sewage gases can enter your bathroom and water can damage your subfloor.
There are three main types:
- Standard wax ring — works for most toilets installed at normal floor height.
- Extra-thick wax ring — needed if your flange sits below floor level.
- Wax ring with plastic horn — adds extra depth for low flanges or tile floors.
Signs You Need to Replace a Toilet Wax Ring
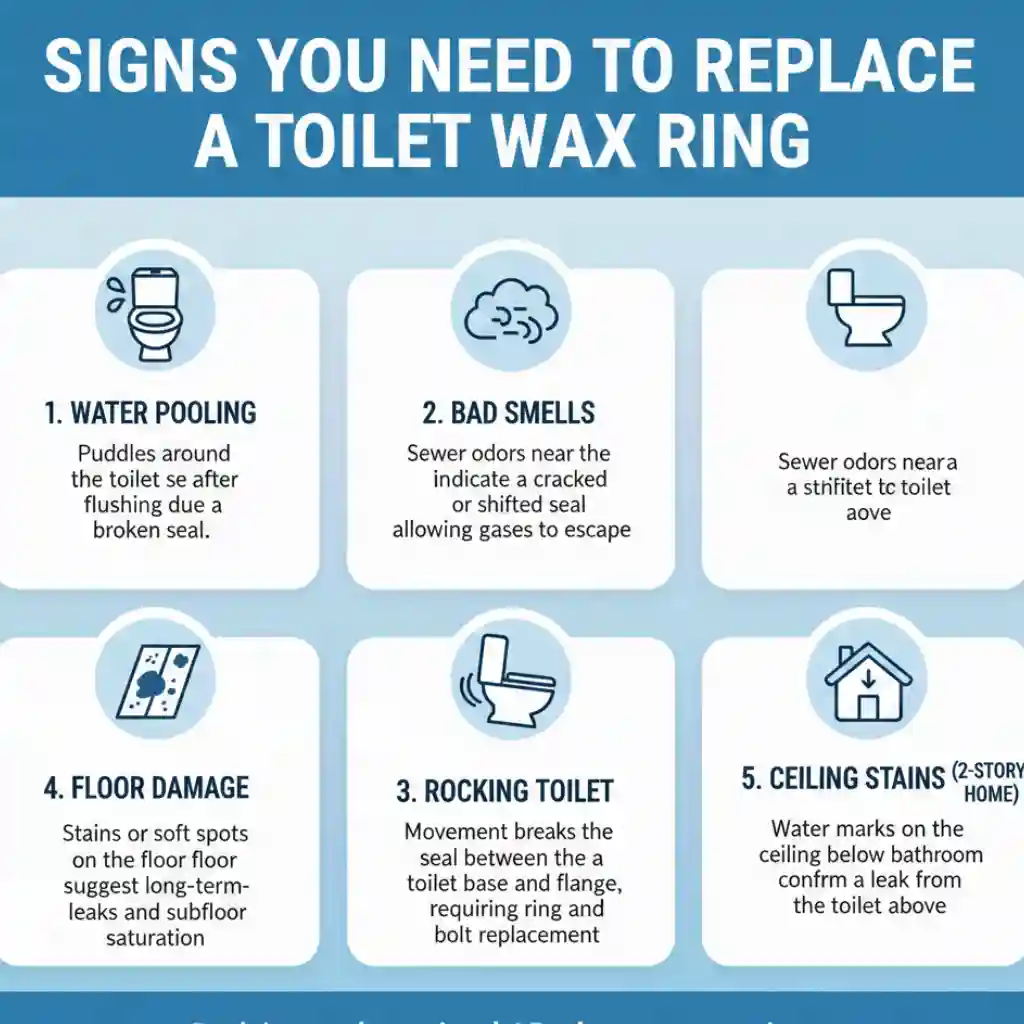
Wax rings don’t last forever. They can dry out, crack, or get crushed if the toilet rocks. Here are the clear signs it’s time for a replacement:
- Water pooling around the base of your toilet after flushing.
- A sewer smell coming from the bathroom floor area.
- Your toilet rocks or wobbles when you sit on it.
- Soft or spongy flooring around the toilet base.
- Brown stains or water damage on the ceiling of the room below.
- You removed the toilet for any reason and always use a new wax ring when reinstalling.
If you notice any of these signs, don’t wait. A bad wax ring gets worse fast. The water damage it causes can be 10 to 20 times more expensive than the repair itself.
How to Replace Wax Ring on Toilet
Replacing a toilet wax ring means lifting the toilet off the floor, removing the old seal, cleaning the flange, placing a new wax ring for toilet installation, and resetting the toilet. It sounds like a lot, but if you follow each step carefully, most people finish in under two hours.
The most important part? Don’t rush. A toilet installed incorrectly needs to come off again. Take your time, especially when setting the toilet down on the new ring. You only press it down once.
Tools and Materials You'll Need
Gather these before you start. Running to the hardware store mid-job is annoying.
Tools:
- Adjustable wrench or channel-lock pliers
- Putty knife or scraper
- Bucket and sponge
- Old towels or rags
- Rubber gloves
- Utility knife (optional, for caulk removal)
- Floor flange repair kit (if the flange is broken)
Materials:
- New toilet wax ring (standard or extra-thick depending on your flange height)
- New toilet bolt caps and closet bolts (if the old ones are corroded)
- Plumber’s putty or silicone caulk (optional, for sealing base)
- Teflon tape (for supply line reconnection)
Pro tip: Buy an extra wax ring. If you drop the first one or press it unevenly, you’ll need a fresh one. They’re only $5–$15 at any hardware store.
Step-by-Step Guide: How to Install a Toilet Wax Ring
Follow these steps in order. Don’t skip ahead.
Step 1: Turn Off the Water Supply
Locate the shut-off valve on the wall behind the toilet. Turn it clockwise until it stops. Flush the toilet to drain the tank and bowl. Use a sponge and bucket to remove any remaining water from the tank and bowl.
Disconnect the water supply line from the bottom of the tank. Have a towel ready and some water will drip out.
Step 2: Remove the Toilet
Pop off the plastic caps at the base of the toilet and use your wrench to loosen the nuts on the closet bolts. If the nuts spin, hold the bolt with pliers while you turn. If they’re too corroded, use a hacksaw to cut the bolts off.
With the nuts removed, break the caulk seal around the base if there is one. Grip the toilet bowl firmly at both sides and lift straight up. Toilets are heavy; they weigh 60 to 120 pounds. Get someone to help if you can.
Set the toilet on its side on cardboard or old towels. Stuff a rag into the open drain hole to block sewer gases while you work.
Step 3: Remove the Old Wax Ring
Use your putty knife to scrape off the old wax from the floor flange and from the bottom of the toilet. Get it as clean as possible. Leftover wax can stop the new ring from sealing properly.
Check the floor flange. It should be solid, level with the floor, and undamaged. If it’s cracked or broken, repair or replace it before continuing. A bad flange means a bad seal no matter how good the wax ring is.
Step 4: Install New Closet Bolts
Slide new closet bolts into the slots on the floor flange. Position them so they line up with the bolt holes on your toilet. They should sit evenly on both sides. Many new wax rings come with new bolts.
Step 5: How to Put the Wax Seal on the Toilet
This step is key. There are two ways to do it both work. Choose whichever feels more comfortable.
Option A — Ring on the Toilet:
Turn the toilet onto its side or back. Press the wax ring onto the toilet outlet (the horn at the bottom). The flat side of the ring faces the toilet; the wax side faces the floor. Press it firmly so it sticks.
Option B — Ring on the Flange:
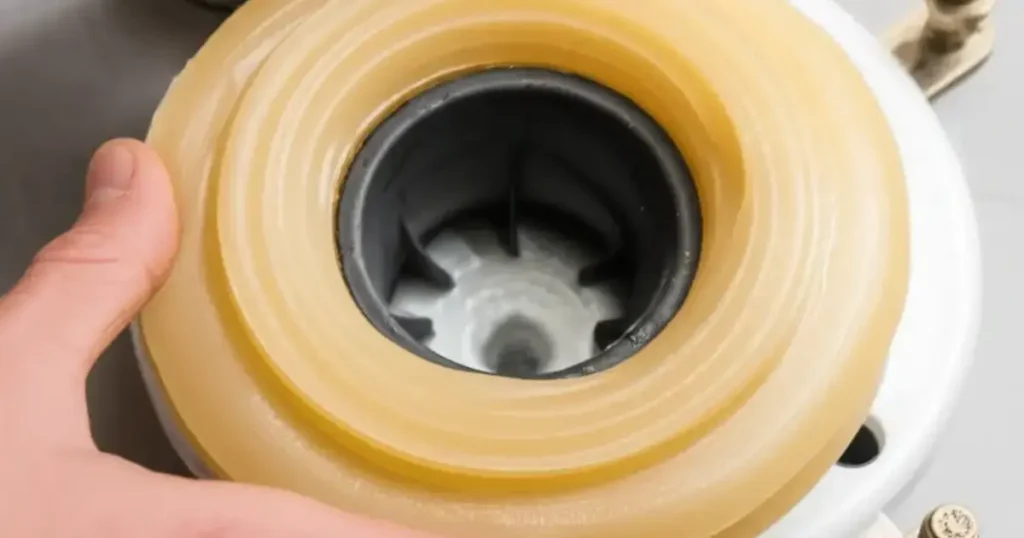
Place the wax ring directly on the floor flange with the wax side facing up. The ring should be centered over the drain opening.
Either method works. The goal is the same: wax ring for toilet installation that lines up perfectly when the toilet is set down.
Step 6: How to Set the Toilet on the Wax Ring
This is the most important step of how to set a toilet on a wax ring. Do it right and you won’t have to redo this job for years.
Remove the rag from the drain hole. Carefully lift the toilet and hold it directly above the flange. Line up the holes at the toilet base with the closet bolts below. Lower the toilet straight down — do not rock or tilt it.
Once the toilet touches the floor, press down firmly with your body weight. Sit on it if needed. The goal is to compress the wax evenly until the toilet base sits flat on the floor.
Critical: Once you set the toilet down, don’t lift it again. Lifting breaks the wax seal. If something goes wrong, you’ll need a new ring.
Step 7: Secure the Toilet
Place a washer and nut on each closet bolt. Hand-tighten first, then use a wrench. Tighten them evenly and alternate from one side to the other. Don’t overtighten. Over-tightening can crack the toilet base.
Cut the bolts to length with a hacksaw if they’re too tall. Snap on the plastic bolt caps. Reconnect the water supply line and turn the water back on slowly.
Step 8: Test and Check for Leaks
Let the tank fill completely. Flush two or three times and watch the base of the toilet carefully. No water should appear on the floor. Check again after a few hours.
If everything looks dry and the toilet sits solid without rocking, you’ve completed a successful toilet wax ring install. Optional: apply a thin bead of caulk around the base to keep the area clean.
You can read about: How to Install a Toilet
Common Mistakes to Avoid
Even experienced DIYers make these errors. Don’t let them happen to you.
- Using the wrong ring thickness. If your flange is below floor level, use an extra-thick ring or a horn ring.
- Stacking two wax rings. It seems like a fix for low flanges, but it creates an uneven seal that fails quickly.
- Rocking or wiggling the toilet when setting it down. This smears the wax and breaks the seal.
- Skipping flange inspection. A damaged flange defeats the purpose of a new ring.
- Overtightening the nuts. Cracks in porcelain are hard to fix and expensive.
- Reusing the old wax ring. Never. Always use a new one, every time.
How Long Does a Toilet Wax Ring Last?
A properly installed wax ring can last 20 to 30 years. Some last as long as the toilet itself. The seal fails early when:
- The toilet rocks because the floor is uneven or the bolts are loose.
- The floor shifts due to settling or moisture damage.
- The toilet was removed and reinstalled without replacing the ring.
- An incorrect ring thickness was used for the flange height.
Keep your toilet stable and the ring should last decades. If you notice any signs of failure early, address it before water damage sets in.
When to Call a Professional
This is a DIY-friendly job, but some situations call for a licensed plumber:
- The floor flange is broken, cracked, or set too far below the floor.
- There is significant water damage or mold under the toilet.
- The drain pipe itself is damaged or misaligned.
- You replaced the ring but the toilet still leaks.
- You’re not comfortable lifting heavy items or working near the drain.
Calling a plumber early saves money. A small leak becomes a subfloor replacement if ignored too long.
Professional Toilet Installation and Repair in Eagle Rock
Sometimes the job is bigger than a wax ring. If you’re in the Eagle Rock area and need help, Derks Plumbing handles everything from simple wax ring replacements to full toilet installations.
Toilet Installation in Eagle Rock is one of the most common service calls Derks Plumbing receives. Cracked flanges, broken seals, tilted toilets they’ve handled it all. The team is licensed, local, and gets to the job fast.
If you’re unsure about the repair or don’t have time to do it yourself, don’t hesitate to call. A professional toilet install gives you peace of mind and a sealed bathroom floor.

Conclusion
Knowing how to install a toilet wax ring saves you money and prevents serious water damage. The job takes under two hours and the materials cost under $20. The steps are straightforward: shut off water, remove the toilet, clean the flange, install a new wax seal on the toilet, set the toilet carefully, secure it, and test.
Take your time on the ring placement and the lowering step. Those are where most mistakes happen. If the job feels too large, Derks Plumbing is ready to help in Eagle Rock. Either way, don’t let a bad wax ring sit the longer you wait, the more damage it causes.
FAQs
Can I install a toilet wax ring myself?
Yes. Most homeowners can do this with basic tools and a couple of hours. The biggest challenge is lifting the toilet. Have someone help you if you can.
Do I need a plumber’s putty with a wax ring?
No. The wax ring handles the watertight seal at the base drain. Plumber’s putty is sometimes used at the water supply fittings, not at the toilet base.
How do I know which wax ring size to buy?
Most toilets use a standard 3-inch or 4-inch ring. The size refers to the drain opening. If the flange sits flush with or slightly above the floor, use standard. If it’s more than half an inch below floor level, get an extra-thick ring or one with a plastic horn.
What happens if the wax ring fails?
Water and sewage gases leak out from the toilet base. Over time, this rots the subfloor, causes mold, and creates a major repair. Always replace a failing ring right away.
Can I reuse an old wax ring?
No. Once a wax ring has been compressed, it loses its ability to seal properly. Always install a new wax ring every time you reset a toilet. They cost less than $15.
How long does a wax ring replacement take?
For most homeowners, 1 to 2 hours from start to finish. A plumber can do it in under an hour. The steps aren’t difficult, just careful.
Should I caulk around the base of the toilet after the wax ring is installed?
It’s optional but recommended for cleanliness. Leave a small gap at the back so any future leaks are visible. Full caulking can hide a leaking wax ring which delays repairs and causes more damage.