Discovering a pinhole leak in your copper pipe can be frustrating, as it often indicates a deeper plumbing issue. Fortunately, you don’t always need costly professional help right away. Learning how to fix pinhole in a copper pipe is a valuable skill that can prevent water damage and reduce repair expenses. For a quick temporary solution, you can use epoxy putty or a pipe repair clamp to stop the leak and control the water flow.
These easy fixes buy you time to arrange a more permanent repair, keeping your plumbing system protected and your home safe from damage.
How to Detect Pinhole Leaks in Copper Pipe
A pinhole leak can be sneaky, but it leaves behind some clear clues. Early detection prevents bigger problems, like mold, mildew, and major damage to your home’s structure. Look for these signs to confirm you need a copper pipe pinhole repair:
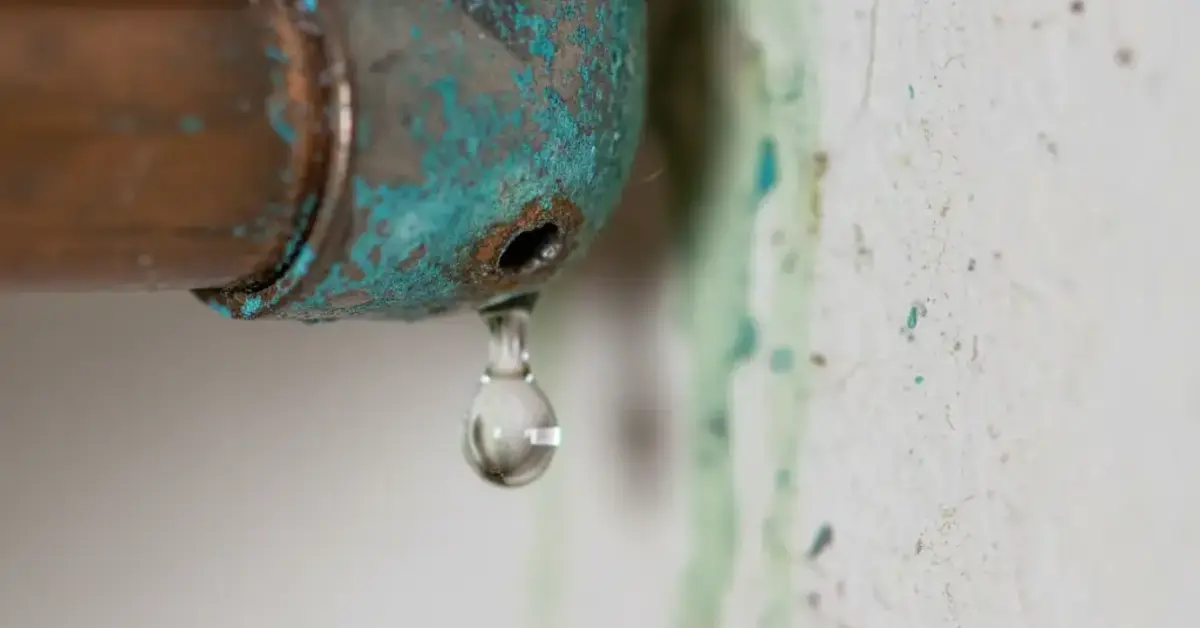
- Blue-Green Stains: Copper reacts with water to create a blue-green stain. If you see this color on exposed pipes or nearby drywall, it is a key sign of a small leak.
- Damp or Discolored Drywall: A leak inside a wall will cause the drywall or ceiling to feel soft, look discolored, or show bubbling. If the area feels spongy, there’s water behind it.
- Low Water Pressure: A leak, even a small one, lets water escape. If you notice a drop in water pressure throughout your house, it might be due to a hidden leak.
- Increased Water Bill: An unexplained jump in your monthly water bill is a strong indicator of an invisible leak. Even a slow drip wastes a lot of water over time.
- Sound of Running Water: When the house is quiet, listen for a faint hiss or the sound of water running when no fixtures are on. This can pinpoint the location of the leak.
What Causes Pinhole Leaks in Copper Pipes
Understanding the cause of the leak is important. Pinholes don’t just happen by accident; they are usually a sign of internal corrosion. This wear is often related to the water flowing through the pipes and the environment around them.
- Pitting Corrosion: This is the most common cause. Certain water qualities, like water that is too acidic (low pH), too alkaline (high pH), or has high levels of dissolved solids or chlorine, can cause tiny, localized points of corrosion. This eats away at the inside of the copper pipe until it creates a small hole.
- High Water Velocity (Turbulence): Water moving too quickly through your pipes can wear down the copper’s protective internal layer. This turbulent flow often happens near fittings or elbows and speeds up corrosion, leading to a pinhole copper pipe repair need.
- Exposure to Outside Materials: If a copper pipe touches materials like steel, concrete, or certain chemicals in the soil, it can lead to galvanic corrosion. This external process also degrades the pipe wall over time.
- Age and Wear: While copper is durable, it doesn’t last forever. Pipes reaching the end of their 20-to-50-year service life are more likely to develop leaks, especially if they’ve been subjected to poor water quality.
Cost to Repair Pinhole Leak in Copper Pipe
The cost to fix pinhole leak in copper pipe varies widely depending on the fix chosen, the leak’s location, and whether you do it yourself or hire a professional.
Repair Type | Cost Range (DIY Materials Only) | Cost Range (Professional Plumbing Service) |
Temporary Patch (Epoxy, Clamp) | $5 to $30 | $150 to $300 (Emergency call fee) |
Permanent Section Replacement (Coupling) | $10 to $50 | $250 to $700 |
Permanent Section Replacement (Soldering) | $50 to $100 | $380 to $750+ |
Accessibility Factor | N/A | High-cost increases if the plumber must cut into drywall or access a crawl space. |
A professional plumber often charges between $120 and $225 per hour, plus the cost of materials. If they have to open a wall or ceiling, that labor and the subsequent drywall repair will increase your final bill significantly. If you have had several pinhole leaks, you might need a whole-house repiping, which can cost thousands.
How to Fix Pinhole Leak in Copper Pipe Without Soldering
A permanent copper pipe repair patch requires cutting out the damaged section and replacing it. While soldering is the traditional method, there are excellent no-solder options that any homeowner can use. These are often the best choice for a quick, code-approved hole in copper pipe fix.
The Permanent, No-Solder Fix: Push-to-Connect Fittings
Push-to-connect fittings, like those made by SharkBite, offer a simple and permanent solution. They use an internal gripping mechanism and an O-ring to create a watertight seal. This method is often code-approved and much faster than soldering.
Tools and Materials:
- Pipe Cutter or Tube Cutter
- Deburring Tool (or utility knife)
- Emery Cloth or Sandpaper
- Measuring Tape and Marker
- New section of Type L copper pipe (same diameter as the leaky pipe)
- Push-to-Connect Slip Coupling
Step-by-Step Guide:
- Shut Off Water: Find your main water shut-off valve and turn it off. Open a nearby faucet to drain the line and relieve pressure.
- Access and Measure: Cut out the damaged section of the pipe using your pipe cutter. For a simple slip coupling, you only need to remove a short section. Measure the space you just cut out.
- Prepare the Pipe Ends: Use the deburring tool or utility knife to clean the inside and outside edges of the existing pipe. This removes burrs that could damage the fitting’s O-ring.
- Clean the Pipe: Thoroughly clean the last inch of the pipe ends with emery cloth or sandpaper. The pipe must be smooth and free of dirt for the fitting to seal correctly.
- Mark Insertion Depth: Push-to-connect fittings require a specific depth of insertion. Use the brand’s depth tool or a measuring tape to mark the correct depth on the existing pipe ends.
- Install the Coupling: Push the slip coupling onto one pipe end until it reaches your mark. Then, center the fitting over the gap and push it onto the other pipe end until it reaches the second mark.
- Test the Repair: Slowly turn the water supply back on and check for leaks.
Temporary Repair Methods (For Emergencies)
If you can’t shut off the water immediately, or just need time to get materials, a temporary copper pipe patch can hold the line.
Method | Material Used | Quick Summary |
Epoxy Putty | Two-part plumber’s epoxy (like J-B Weld WaterWeld) | Knead the putty until it’s one color, then press it firmly over the pinhole. Must be applied to a dry pipe. |
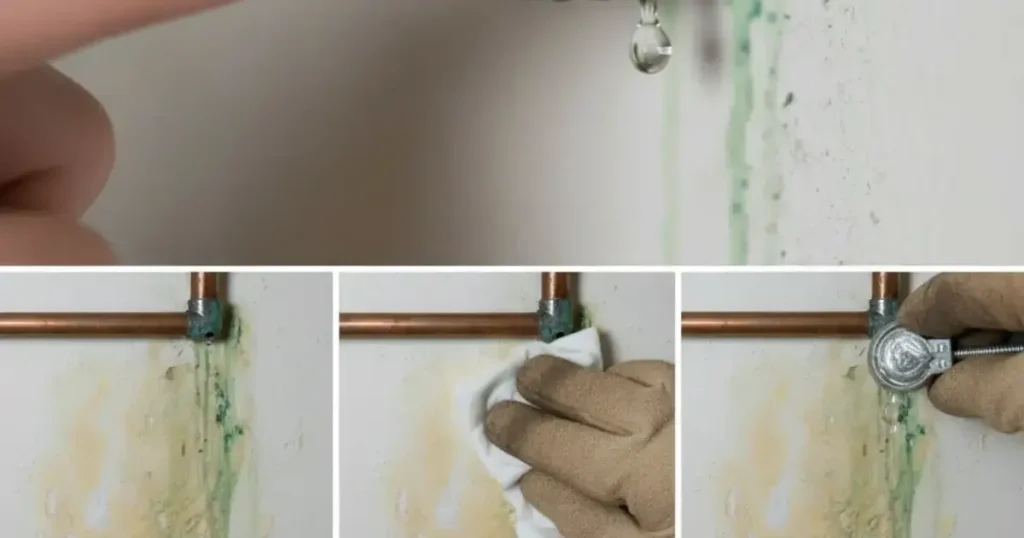
Repair Clamp | Rubber-lined metal clamp | Position the rubber over the leak and tighten the clamp screws. This is a durable temporary fix, even on wet lines. |
Pipe Repair Wrap | Fiberglass resin tape (often water-activated) | Soak the resin tape and wrap it tightly around the pipe, overlapping the leak. Cures hard like a cast. |
These temporary methods are not a permanent fix. They provide a seal but do not address the pipe’s underlying weakness. Always follow up with a permanent repair as soon as possible.
Preventative Measures Against Pinhole Leaks
The best how to repair copper pipes guide is one that tells you how to avoid the problem entirely. Being proactive about your water system can save you from future headaches.
- Test Your Water: Have your water tested for pH level, total dissolved solids, and chlorine content. If your water is too acidic or too alkaline, a plumber can recommend an inline water treatment system to neutralize it.
- Install a Water Filter: Whole-house filtration can reduce chemical levels, especially chlorine and chloramine, which are known to accelerate copper corrosion.
- Check Water Pressure: If your home’s water pressure is too high (above 80 psi), consider installing a pressure reducing valve (PRV). High pressure leads to water turbulence, which causes pipe erosion.
- Proper Installation and Support: Ensure that your copper pipes are properly grounded and not in direct contact with incompatible materials like concrete or steel hangers.
You can read about: Should I Replace Copper Pipes in My Home?
Conclusion
Tackling a pinhole leak in your copper piping might seem stressful, but with the right knowledge and tools, you can manage the crisis effectively. Whether you use an emergency patch or a permanent, no-solder coupling, the goal is to stop the water damage and restore your plumbing integrity. Remember that a pinhole is a symptom of internal corrosion, so don’t just patch it consider the underlying cause. For any complex or inaccessible copper pipe pinhole repair needs, trust the experts.
If you are in the Southern California area and need professional help, contact Derks Plumbing for reliable service. We provide lasting solutions for all your plumbing needs, including specialized Copper Pipe Repair Eagle Rock services.
FAQs
Q: Is a pinhole leak in a copper pipe a major emergency?
Yes, it is a priority. Even a small pinhole leak can release hundreds of gallons of water over a week, causing significant damage to walls, floors, and electrical systems. Shut off the water immediately and make a temporary fix.
Q: Can I use duct tape or super glue to fix a pinhole leak?
No. Duct tape and super glue are not designed to withstand water pressure or temperature changes and will fail quickly. Use dedicated plumbing materials like epoxy putty, a repair clamp, or fiberglass wrap for a reliable temporary fix.
Q: Are push-to-connect fittings a permanent fix for copper pipe pinhole leak?
Yes, push-to-connect fittings like SharkBite are considered a permanent, code-approved way to splice in a new piece of pipe. They offer a lasting seal and are much easier for a non-professional to install than soldered fittings.
Q: How long will a temporary repair last?
A quality temporary repair, such as a repair clamp or plumber’s epoxy, can hold for a few weeks to a few months. However, the leak will eventually re-emerge as the corrosion continues. You should always plan to replace the damaged section of pipe permanently as soon as possible.
Q: Should I use Type M or Type L copper pipe for a repair?
Type L copper pipe is recommended for repairs. It has a thicker wall than Type M, making it more resistant to future internal corrosion and offering a longer life span.