How Does A Garbage Disposal Work?
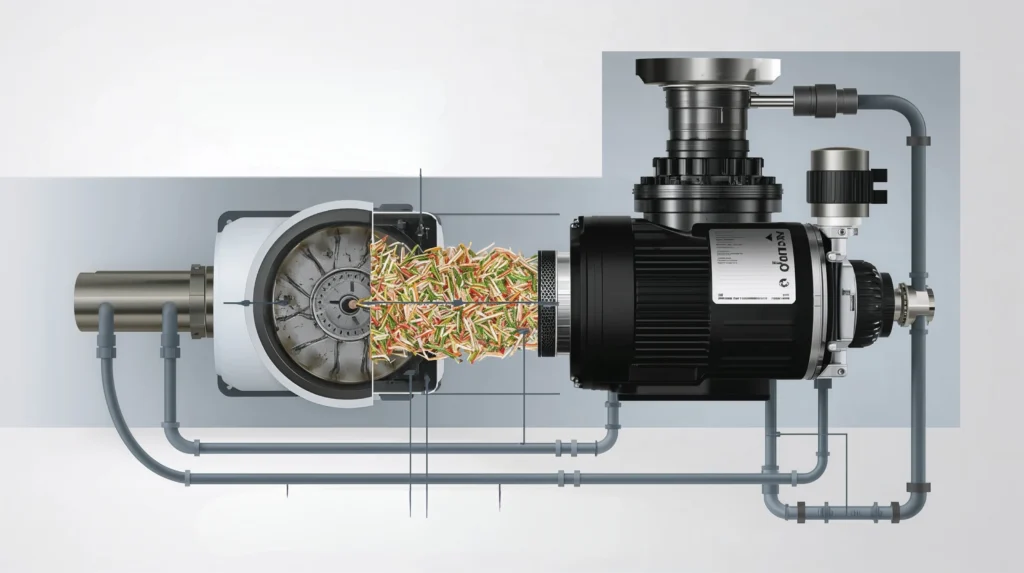
A garbage disposal is an important cooking appliance that gets rid of food waste quickly. It fits under your kitchen sink and breaks down food scraps into small pieces that are easy to flush down the drain. But how does a garbage disposal work? What are the most important things that make it work? This article will explain the working methods of trash disposal, what its main parts are, how to keep it in good shape, and a lot more. Purpose of Garbage Disposal Garbage disposals serve a simple but very useful purpose. It helps cut down on the loss of food that would otherwise go to the trash or landfill. Because of this, there is less trash, and it’s easier and faster to clean up the kitchen. It keeps your kitchen smelling fresh by grinding food waste into small pieces that don’t get stuck in drains. A garbage disposal is basically a machine that gets rid of trash and handles food scraps quickly and with little trouble. How Does a Garbage Disposal Work? To understand how a garbage filter works, you need to know how it’s put together. Food scraps are put into the grinding chamber when you turn on the garbage disposal. There, rotating blades break them up into smaller bits. The small particles are then washed away by moving water, which makes their way down the drain and into the pipes. The Stages of How a Garbage Disposal Works: Food Waste Enters the Grinding Chamber: Food scraps are flushed into the grinding chamber from your sink drain. Grinding Process: The motor activates the garbage disposal blades, which rotate rapidly, grinding the food waste into smaller pieces. Flushing Through the Drain: Once the food is ground into small particles, cold water helps push it through the disposal’s drain line, where it flows safely to the sewer or septic system. The whole process happens quickly, in just a matter of seconds, transforming large food scraps into fine particles that are easy to manage. Key Parts of a Garbage Disposal System To better understand how a garbage disposal works, let’s take a look at the critical garbage disposal parts that make this system function effectively. Motor: The motor is the heart of the garbage disposal, responsible for rotating the blades and powering the grinding mechanism. The motor typically runs between ½ to 1 horsepower, depending on the model. Grinding Chamber: This is the compartment where food waste is ground into smaller particles. Inside the chamber, the food waste is broken down by garbage disposal blades. Flywheel: The flywheel is a disk that rotates when the motor is turned on. It connects to the grinding components and helps crush the food waste. Grinding Blades: These blades are responsible for breaking down the food scraps. The blades are mounted on the flywheel, and as the flywheel spins, the blades shred the food into tiny bits. Discharge Tube: The discharge tube sends the ground waste out of the disposal and into the drain line, from where it travels to the sewer or septic system. Mounting System: The mounting system holds the garbage disposal unit in place under the sink and attaches it to the sink drain. Reset Button: If the garbage disposal becomes jammed or overheated, the reset button can be pressed to restart the motor and allow it to resume normal operation. Garbage Disposal Blades and Their Role in Grinding One of the most important components of a garbage disposal is the garbage disposal blades. These sharp blades spin at high speeds to crush and grind the food waste inside the grinding chamber. There are two types of blades commonly used: Impeller Blades: These are blunt, metal blades that move food waste around and force it toward the grinding plate. Grinding Plates: These are serrated metal surfaces that work in tandem with impeller blades to finely chop food waste. Over time, these blades may require garbage disposal blades replacement if they become dull or damaged. Proper care and occasional replacement of blades ensure that your garbage disposal continues to work efficiently. Understanding the Garbage Disposal Motor and How It Powers the Unit The motor in a garbage disposal is critical to the unit’s performance. It powers the grinding blades, helping them spin at speeds that crush food scraps. The motor is connected to a flywheel that turns the blades, and this spinning motion is what creates the grinding action. If the motor fails or gets overheated, the disposal will stop working, leading to the need for garbage disposal troubleshooting. Regular maintenance and checks are essential to ensure that the motor remains in good condition. The Importance of Proper Garbage Disposal Use To get the most out of your garbage disposal, it’s essential to know how to use a garbage disposal properly. Here are some key tips: Use cold water: Always run cold water when the disposal is on to help solidify any fats or oils, making it easier to break them down. Feed waste slowly: Avoid overloading the disposal by feeding it food scraps gradually. Avoid putting large, hard items down the drain: Bones, fibrous vegetables, and large quantities of food can damage the blades or cause clogs. By using the garbage disposal correctly, you’ll help prevent damage to the sink waste disposal system and extend the lifespan of the appliance. How to Maintain Your Garbage Disposal Proper garbage disposal maintenance is key to ensuring that your unit lasts as long as possible and works efficiently. Regular cleaning helps prevent odors, and timely repairs prevent small issues from becoming major problems. Maintenance Tips: Clean the grinding chamber: Use ice cubes or citrus peels to clean the blades and remove stuck food scraps. Deodorize regularly: Running a mixture of baking soda and vinegar through the disposal can eliminate bad odors. Check for leaks: Inspect the seals and pipes regularly to avoid any leaks that could cause water damage. Garbage Disposal Troubleshooting: How to Fix Common Problems Even the best garbage disposal units